Replica Movie Props

Saturday, January 31, 2009

Work on the dome

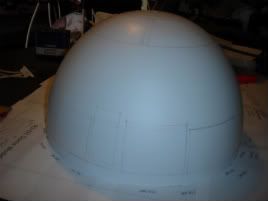
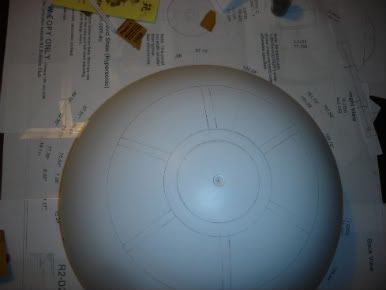
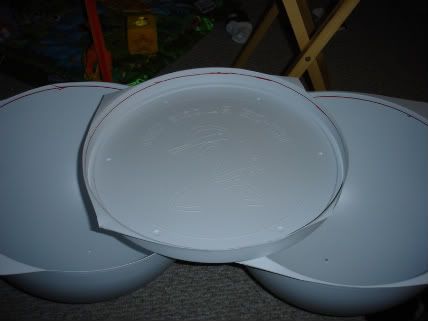
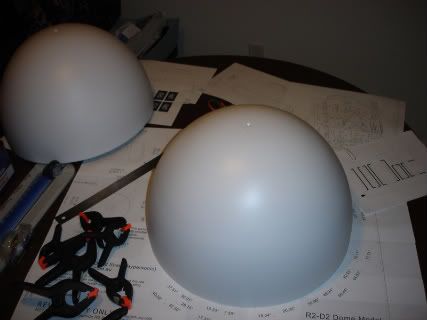
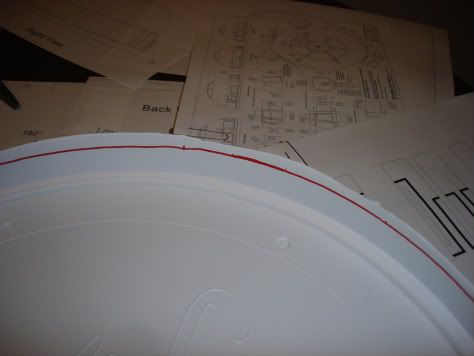
It took me three tries, but I finally got the right measurements on the pie panels on top of the dome. I used the same measurements on my C&D dome as are used on the 300mm dome. Once I figured that out I used the wrap-around template and a homemade tracing jig to finish up the side panels.

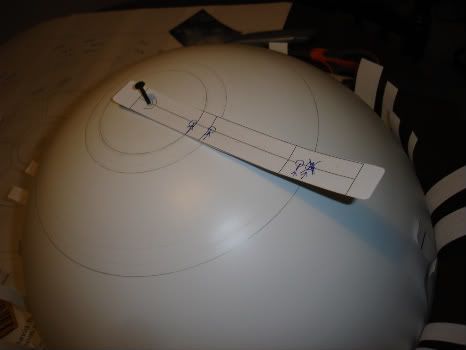
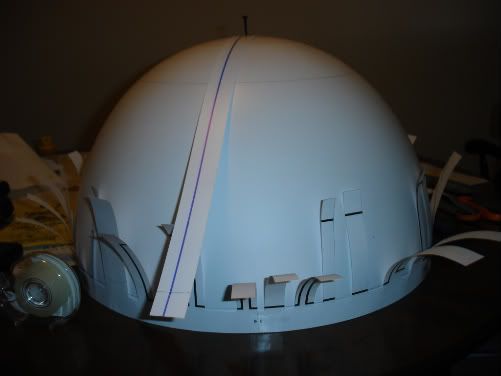
I made the horizontal lines with a couple of jigs made from some scrap styrene. The vertical lines on the pie panels were made with a star pattern paper template. The vertical lines on the side panels were made from the wrap-around paper templates and drawn with a straight edge.

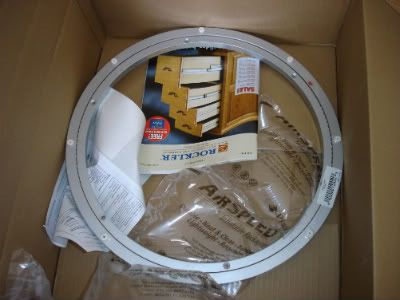
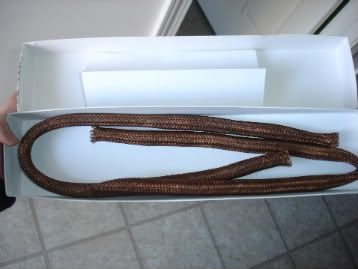
I also got my Rockler bearing and pre-aged bronze braded hose for when I get around to making R2’s feet.


Sunday, January 25, 2009

Working on the Dome

I have been doing the preliminary trimming on the dome and ring. I started by marking the line on the inside of the pieces with a marker. This way it was easier to see while I cut.

I used regular metal scissors to cut the domes and the corners ooff the ring. I still need to trim the ring up. Once they are all cut, I'll take some sandpaper to the bottoms to even them out. At least that is the plan.


Friday, January 23, 2009

Domes and Bearings

I got my domes and ring last night:


I just picked up my rockler bearing.
http://www.rockler.com/product.cfm?page=2272
This will allow the dome to be able to spin. I will not be motorizing this droid, though I am leaving the option open for future up-grades.

Thursday, January 22, 2009

Dome Upgrade

Great news for me! I just made some prop sales and was able to pick up a set of C & D 300mm domes and ring. Now that I am upgrading to a more correct dome than the old Aspects I need to pick up a Rockler bearing too. All in good time.

C & D domes (for the uninitiated) are styrene vac formed domes of the correct size and dimensions. The styrene ring is the lower part of the dome. In all-metal versions of the dome the ring would be part of the spun metal dome. The extra depth probably makes a good vac-form pull too difficult.

The nice thing about these styrene domes and ring is four fold. 1. I can paint them separately 2. The ring has the Rockler bearing mounting holes pre-marked, 3. Since the ring is a solid disk, there is no need to build inner supports for the dome, though I imagine I’ll need to cut some of it out in order to have access to the electronics I will be mounting in the dome, and 4. A two layer dome of the correct size is just so much better than retrofitting the Aspects dome to a correctly sized R2 body, which was what I was planning on doing.

Pictures will be forthcoming as they have not arrived yet.

Friday, January 16, 2009

Resin and LEDs

I got my first shipment of resin parts. Mostly dome stuff, but I did go ahead and get my vent surrounds. I figure I can scratcch build the vents while it's too cold to work in the garag.


I also got almost all my electronics. I still need my resistors and a 12v battery. I am playing with the idea of putting an RF remote switch in the dome to turn the lights on and off. More on that when I figure it out.


Monday, January 12, 2009

I pulled the plug. Don't worry, it's a good thing.

I got the plug out of the mold. It really needs some TLC. Putty and sand… Oh well, lessons learned, it’ll still work. I used hydra cal. I got it at Hobbytown USA. I bet it can be gotten cheaper somewhere else.
http://i7.photobucket.com/albums/y297/boozee/DSC05051.jpg

I also got my electronics today. I got the pic flasher (left) and the blue/red flasher (right). I am still waiting on the LEDs and resistors I am going to use.
http://i7.photobucket.com/albums/y297/boozee/DSC05054.jpg

Sunday, January 11, 2009

OK, tried something new

OK, not vacuum formed, but I did use the frame and the oven. I need to make a plug to form panels for my R2 dome. My oven is not big enough to form the whole dome, so I need to make a plug of part of it.

Now, I may be going about this backwards, but I decided to form the part of the dome I wanted by just pressing the hot plastic over it. Then I can use this to make a plaster plug by pouring plaster into it. You can probably see the little bumps and imperfections in the plastic caused by the tape on the dome. This will have to be fixed on the plug using putty and sand paper.

Here's shots of what I did. The dome is mounted on a scrap wood base to keep it steady while I formed the plastic over it.

Wood in dome, plug to coome


I got the cookie cut and in place. This will keep the acrylic dome rigid while I do some plug making.


Saturday, January 10, 2009

R2 Building begins. At least blogging it begins.

I guess I should start with the perfect cliché: A long, long time ago... in 2002. I bought an aspects dome and realized I was way in over my head.

Nearly 7 years later, I think I am ready. I am starting with that same aspects dome I bought back then. I am currently waiting on dome electronics, the PVC body tube I wanted, styrene skins, and the first round of resin parts to arrive.

In the mean time, I picked up a good router and also built my first vacuum forming box. Instead of painting the blue panels on the dome, I am trying out an idea of forming thin styrene over the dome and cutting out the panels from that I'll then paint them and attach them. That is, if my idea pans out.